Http之HttpServlet
HttpServlet之Response
在前面,我们学习了HttpServlet中的Request对象,Request对象是对客户端浏览器请求的数据封装,其实本质就是对http请求体的封装
同样,按照http协议的交互模式,一次请求对应一次响应,那么在接收到用户请求之后,服务端要根据客户端的请求做出响应,那么这个响应对象的封装就是Response,也就是对http响应体的封装
设置响应行
public void setStatus(int sc) 根据参数名获取参数值
设置响应头
public void setHeader(String name, String value) 根据参数名获取参数值
设置响应体
实现步骤
1.获取输出流
字符输出流:public PrintWriter getWriter()
字节输出流:public ServletOutputStream getOutputStream()
2.通过输出流将数据写出
代码演示说明
1
2
3
4
5
6
7
8
9
10
11
12
13
14
15
16
17
18
19
20
21
22
23
24
| @WebServlet("/myHttpServlet")
public class MyHttpServlet extends HttpServlet {
@Override
protected void doGet(HttpServletRequest request, HttpServletResponse response) throws ServletException, IOException {
String content = "你好 servlet";
response.setHeader("content-type", "text/html;charset=utf-8");
response.setStatus(HttpServletResponse.SC_OK);
PrintWriter out = response.getWriter();
out.write(content);
out.close();
}
@Override
protected void doPost(HttpServletRequest request, HttpServletResponse response) throws ServletException, IOException {
String userName = request.getParameter("userName");
String userPassword = request.getParameter("userPassword");
String userAge = request.getParameter("age");
System.out.println(userName);
System.out.println(userPassword);
System.out.println(userAge);
}
}
|
请求转发与重定向
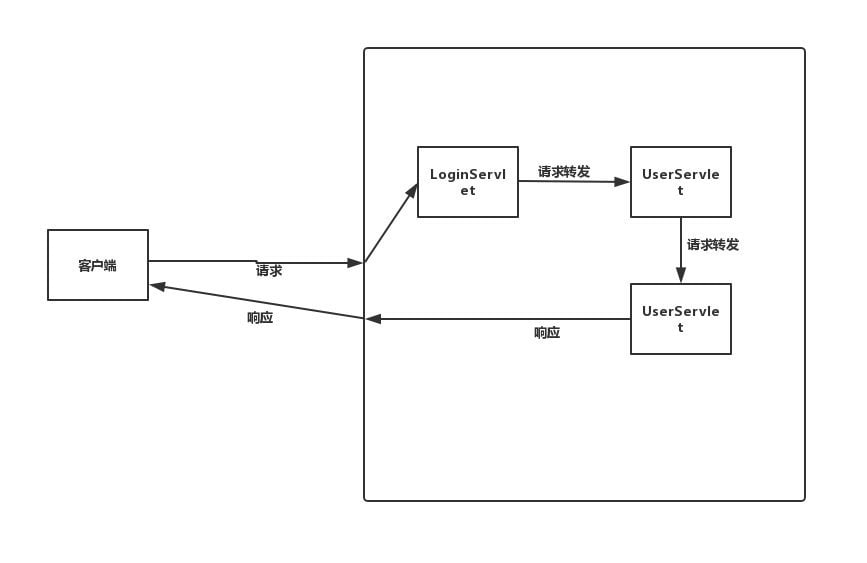
对于任何一个业务系统,我们都不可能把所有的请求处理的功能都放在一个Servlet中,根据面向对象设计的理念,我们会把不同的业务请求分散在不同的Servlet中,让多个Servlet之间相互协作来完成整个业务功能
至此,我们涉及到两种多个Servlet间协同调用的方法
- 请求转发:客户端一次请求,服务端内部多次跳转
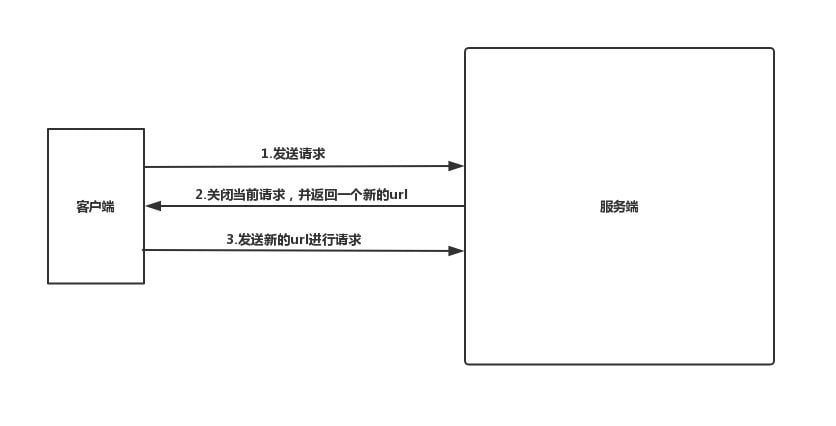
- 重定向:关闭当前请求,并发送一个新的url到客户端,客户端使用的新的url进行请求
请求转发
代码演示说明
1
2
3
4
5
6
7
8
9
10
11
12
13
| @WebServlet("/myHttpServlet")
public class MyHttpServlet extends HttpServlet {
@Override
protected void doGet(HttpServletRequest request, HttpServletResponse response) throws ServletException, IOException {
request.getRequestDispatcher("/index.html").forward(request, response);
}
@Override
protected void doPost(HttpServletRequest request, HttpServletResponse response) throws ServletException, IOException {
}
}
|
重定向
代码演示说明
1
2
3
4
5
6
7
8
9
10
11
12
13
| @WebServlet("/myHttpServlet")
public class MyHttpServlet extends HttpServlet {
@Override
protected void doGet(HttpServletRequest request, HttpServletResponse response) throws ServletException, IOException {
response.sendRedirect("index.html");
}
@Override
protected void doPost(HttpServletRequest request, HttpServletResponse response) throws ServletException, IOException {
}
}
|
请求转发中的数据共享
在请求转发过程中,经常需要在多个跳转中进行数据共享
共享数据方法
public Object getAttribute(String name) 根据名称获取对应数据public void setAttribute(String name, Object o) 添加共享数据public void removeAttribute(String name) 移除指定名称的数据
JSP
JSP概述
JSP(Java Server Page),java服务器页面,其根本是一个简化的Servlet
它是在传统的HTML上加入了Java代码,从而形成了JSP文件,文件以.jsp为后缀
JSP指令
JSP指令用于配置JSP页面以及资源文件的导入
指令格式
<%@ 指令名称 属性名1=属性值1 属性名2=属性值2 %>
指令分类
- page
- contentType:等同于response.setContentType()
- import:导包
- errorPage:当前页面异常时,自动跳转到指定页面
- include:导入其他页面
- taglib:导入资源
代码演示说明
1
2
3
4
5
6
7
8
9
10
11
12
13
14
| <%@ page contentType="text/html;charset=UTF-8" language="java" isErrorPage="false" %>
<%@ page import="java.util.Arrays" %>
<%@ include file="index.html" %>
<%@taglib prefix="c" uri="http://java.sun.com/jsp/jstl/core" %>
<html>
<head>
<title>Title</title>
</head>
<body>
</body>
</html>
|
EL表达式
EL全名Expression Language,表达式语言
主要用于简化和替换jsp页面中java代码
所有的EL表达式都是以${开始以}结束
代码演示说明
1
2
3
4
5
6
7
8
9
10
11
12
13
| <%@ page contentType="text/html;charset=UTF-8" language="java" %>
<%@taglib prefix="c" uri="http://java.sun.com/jsp/jstl/core" %>
<html>
<head>
<title>Title</title>
</head>
<body>
${1 + 2}
${1 > 2}
${2 % 10}
</body>
</html>
|
1
2
3
4
5
6
7
8
9
10
11
12
13
| <%@ page contentType="text/html;charset=UTF-8" language="java" %>
<%@taglib prefix="c" uri="http://java.sun.com/jsp/jstl/core" %>
<html>
<head>
<title>Title</title>
</head>
<body>
${1 + 2}
${1 > 2}
${2 % 10}
</body>
</html>
|
EL运算符
- 算术运算符:+、-、 *、 /、 %
- 比较运算符:> 、<、 >=、 <=、 !=
- 逻辑运算符:&&、||、!
- 空运算符:empty
JSTL标签
jstl(JavaServer Pages Standard Tag Library,JSP标准标签库)
由apche开发的jsp标签,捐献给了sun公司,sun命名为jstl
如何使用jstl
导入jstl相关jar文件
在jsp页面引入jstl标签
<%@taglib prefix=”c” uri=”http://java.sun.com/jsp/jstl/core" %>
使用标签
jstl常用标签
if标签
1
2
3
4
5
6
7
8
9
10
11
12
13
| <%@ page contentType="text/html;charset=UTF-8" language="java" %>
<%@taglib prefix="c" uri="http://java.sun.com/jsp/jstl/core" %>
<html>
<head>
<title>Title</title>
</head>
<body>
<c:if test="${1 == 2}">
true
</c:if>
</body>
</html>
|
choose标签
1
2
3
4
5
6
7
8
9
10
11
12
13
14
15
16
17
18
19
20
21
22
23
| <%@ page contentType="text/html;charset=UTF-8" language="java" %>
<%@taglib prefix="c" uri="http://java.sun.com/jsp/jstl/core" %>
<html>
<head>
<title>Title</title>
</head>
<body>
<c:choose>
<c:when test="${1 > 2}">
1 > 2
</c:when>
<c:when test="${1 < 2}">
1 < 2
</c:when>
<c:otherwise>
1 == 2
</c:otherwise>
</c:choose>
</body>
</html>
|
foreach标签
1
2
3
4
5
6
7
8
9
10
11
12
13
| <%@ page contentType="text/html;charset=UTF-8" language="java" %>
<%@taglib prefix="c" uri="http://java.sun.com/jsp/jstl/core" %>
<html>
<head>
<title>Title</title>
</head>
<body>
<c:forEach var="user" items="${list}">
用户名: ${user.userName}
</c:forEach>
</body>
</html>
|
Session&Cookie
会话跟踪概述
我们之前说过,http协议是一种无状态的协议,那么客户端每次发起的请求对于服务端来说都是一次新的请求。
在很多时候,我们需要对客户端的会话进行跟踪,这种技术就称之为会话跟踪技术
在java中,实现会话跟踪的技术有两种
- Session:位于服务端的会话跟踪技术,数据保存在服务端
- Cookie:位于客户端的会话跟踪技术,数据保存在客户端
Session会话
代码演示说明
1
2
3
4
5
6
7
8
9
10
11
12
13
14
15
| @WebServlet("/myHttpServlet")
public class MyHttpServlet extends HttpServlet {
@Override
protected void doGet(HttpServletRequest request, HttpServletResponse response) throws ServletException, IOException {
HttpSession session = request.getSession();
session.setAttribute("currentUser", new User());
}
@Override
protected void doPost(HttpServletRequest request, HttpServletResponse response) throws ServletException, IOException {
}
}
|
Cookie
代码演示说明
1
2
3
4
5
6
7
8
9
10
11
12
13
14
15
16
17
18
19
20
| @WebServlet("/myHttpServlet")
public class MyHttpServlet extends HttpServlet {
@Override
protected void doGet(HttpServletRequest request, HttpServletResponse response) throws ServletException, IOException {
Cookie[] cookies = request.getCookies();
for(Cookie cookie : cookies) {
if("userName".equals(cookie.getName())) {
String userName = cookie.getValue();
System.out.println("userName: " + cookie.getName());
}
}
}
@Override
protected void doPost(HttpServletRequest request, HttpServletResponse response) throws ServletException, IOException {
response.addCookie(new Cookie("userName", "admin"));
response.addCookie(new Cookie("userPassword", "123456"));
}
}
|
Filter过滤器
Filter入门
过滤器,通常用于特定请求的拦截,通常用于会话验证、统一编码处理等
实现步骤
- 自定义类并实现Filter接口
- 重写filter方法
- 配置拦截路径
代码演示说明
1
2
3
4
5
6
7
8
9
10
11
12
13
14
15
16
17
18
19
20
21
22
23
24
25
| @WebFilter("/*")
public class MyFilter implements Filter {
@Override
public void init(FilterConfig filterConfig) throws ServletException {
}
@Override
public void doFilter(ServletRequest servletRequest, ServletResponse servletResponse, FilterChain filterChain) throws IOException, ServletException {
HttpServletRequest request = (HttpServletRequest)servletRequest;
HttpServletResponse response = (HttpServletResponse)servletResponse;
request.setCharacterEncoding("utf-8");
response.setCharacterEncoding("utf-8");
filterChain.doFilter(request, response);
}
@Override
public void destroy() {
}
}
|